OPINION CONTRIBUTION FROM DAVE DILLON, ChaseTheSummit.com
Winter Hiking has changed the way I view winter here in the North East. Just a couple years ago October would roll in and my depression would set in. Soon I’d be scraping my cars windshield and shoveling my driveway with a grimace on my face. While I still dread shoveling and scraping, the winter season has also brought me my favorite hobby… Winter hiking!
You receive a mixture of reactions when you tell people that you’re going to venture out on a sub zero day to climb to the top of a 5000 foot peak that would expose you to a windchill plummeting to 20 below zero. People are either fascinated or confused why you would ever want to torture yourself like this.
I’ve had a lot of 3 Season hikers ask me about my winter hiking experiences. How to get started? What do I wear? What do I bring? How do you stay warm? etc… I’m hoping to answer some of these questions in the following.
It’s important to remember that just because this system works for me… it may not work for you. The gear and advice I have is only my opinion and what I’ve determined works best for me and my needs. It’s also important to remember that I mainly hike in the White Mountains of New Hampshire and other areas in the North East. Terrain, climate and location all play in a roll in what kind of gear you’ll need to carry.
So lets get started.
Knowledge Is Power
In 2014 I decided I was experienced enough in 3 season hiking to expand into the winter months. While I’m usually the type to shoot from the hip and just go for it. My wife convinced me I should further my education and take a course that would teach me how to safely accomplish winter hikes. You have several options when it comes to taking an organized winter hiking course. I recommend that you take advantage go one.
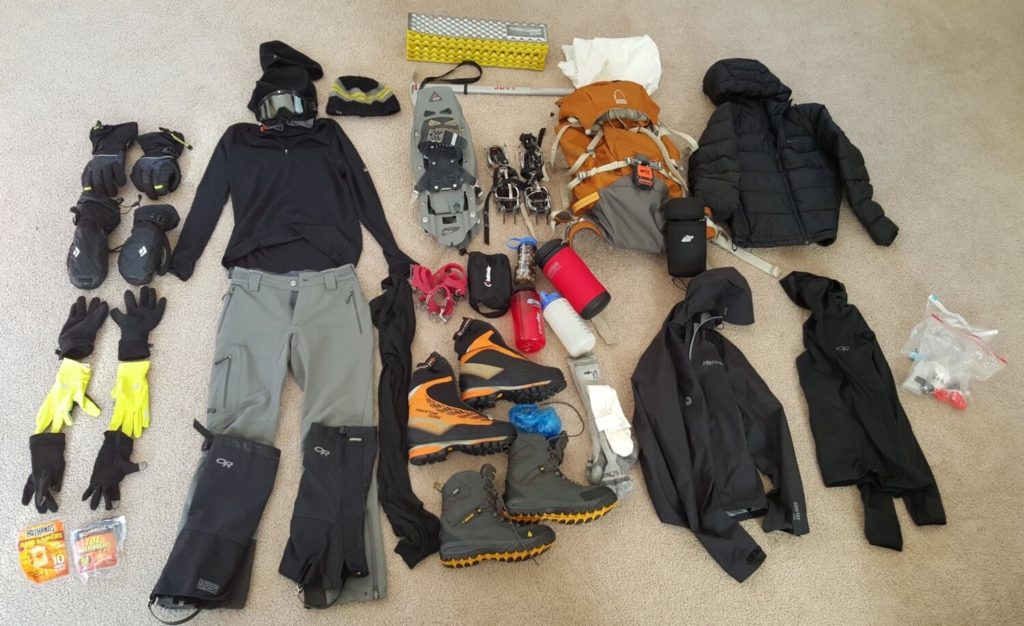
Where winter hiking differs the most from 3 season hiking is what you’ll need to bring. There’s really no “ultra light” way to winter hike safely. More gear, bigger packs, and extra layers are key. It’s important to remember that this list is mainly for day hikes, winter camping is a whole different animal. The forecast also plays a major role on what equipment I might leave behind.
Clothing
Don’t overheat!
A common misconception with winter hiking is what you need to wear. People have this vision of someone wearing a full down Himalayan expedition suit and several layers underneath to keep from freezing to death. While keeping warm is the general idea, you need to remember that your body generates a tremendous amount of heat while you’re slogging up a steep snow climb in snowshoes. The most important thing is to REDUCE SWEATING as much as possible. Sweat means you get wet, getting wet means you lose your heat, losing your heat means… well you get the idea. It’s impossible not to sweat, but making smart decisions can keep it to a minimum and keep you comfortable.
Materials
Another important guideline while choosing clothing is materials. There’s a saying in the hiking community “COTTON KILLS”. Stay away from cotton products, they absorb water and take a long time to dry out. While it’s OK to shovel your driveway in your favorite cotton hoody, hiking Mt. Washington with one on could result in your untimely departure when it gets soaked and cold. Look for synthetics like polyester, polypropylene, or natural fibers like wool. While wool is a fantastic material I find myself using synthetics due to cost. Fleece is a great affordable material for layers, hats and gloves that comes in an array of thicknesses (or weights) and types.
Synthetic And Down Insulation
Puffy Insulation layers come in two varieties Synthetic or Natural Down. Down is more compressible and lighter but loses it’s effectiveness when wet. While Synthetics (Primaloft, Thermoball, Thinsulate, etc…) work when wet, but are usually less compressible and weigh more for the same warmth. Down is usually more expensive, but a worthwhile investment in my opinion.
Down is rated by “Fill Power” which is essentially how airy or lofty it is. Fill power varies between 300 and 900 the latter being premium grade. High fill power down will have a higher warmth to weight ratio and also be more compressible. New technology in down products claim water resistance (dridown, downtek, etc…) this newer flavor of down supposedly can protect your garment from becoming useless when wet. This added treatment is a nice bonus when trying to make a purchasing decision, however it does add to the cost.
Synthetic Insulation also comes in different forms. Companies like Primaloft for example, have silver, gold, sport, and premium (or One) varieties. However, the advantages and disadvantages between the different blends are harder to distinguish than Down counterparts.
Layering Is Key
Beginners might find themselves trying to buy one garment to do everything. This results in you either getting too cold or too hot. Layering several pieces of clothing together allows you to regulate your temperature on the move and adapt to any environment. There’s a general guide to layering called a “3 layer system”. It looks something like this:
3 Layer System:
Base Layer – Example: Underwear, Thin Synthetic or Wool T-Shirt, Thin thermal tights
Insulation Mid Layer – Example: Fleece, puffy, or wool jacket, or an additional base layer
Shell Layer – Waterproof, Windproof or Resistant jacket and pants
This is not to say it’s the only way to do it. You can mix and match all you want… whatever works for you!
Head Gear
Hats and Beanies
My hat selection fluctuates greatly with the temperature and wind. I’ll usually start a hike feeling cold and wearing a heavy wool beanie. After I warm up a bit I’ll swap to a thin fleece beanie that I’ll actively remove and replace to regulate my temperature. If I’m moving fast and feeling warm I’ll lose the hat all together and let my head vent.
Neck Gaiter And Balaclava
If I’m above treeline and the wind is REALLY howling I’ll add a layer of protection in the form of a thin wind proof fleece balaclava or neck gaiter. A Balaclava is a sock for your head with cut outs for your eyes. A Neck Gaiter is essentially just a tube of fabric that you can use to cover your nose, and mouth. By using a neck gaiter combined with a beanie you can create a balaclava. Protecting exposed fragile facial skin to blustery wind is important to prevent frostbite.
Goggles
When things get really windy you’ll want to wear goggles, I chose SPY+ optics goggles as they were inexpensive and seemed well made. Goggles are a great piece of gear to protect your eyes and face. Unfortunately they tend to fog up and freeze reducing visibility when you sweat while wearing them. I use a product called “Frog Spit” which is an “anti-fog cleaner” and it has greatly reduced the issue! Be sure to purchase goggles with a vented lens, it helps to reduce condensation.
Torso
I start almost every hike wearing a thin synthetic short sleeved T-Shirt as a base layer. The base layer is important as it wicks sweat away from the body and promotes evaporation. On top of that I add a thin synthetic long sleeved layer with a zippered neck. The zippered neck feature is nice to allow venting of extra heat while you’re running hot on the move. These two thin layers may not seem like much, but I find myself hiking in this down into the teens. I stay relatively dry and comfortable.
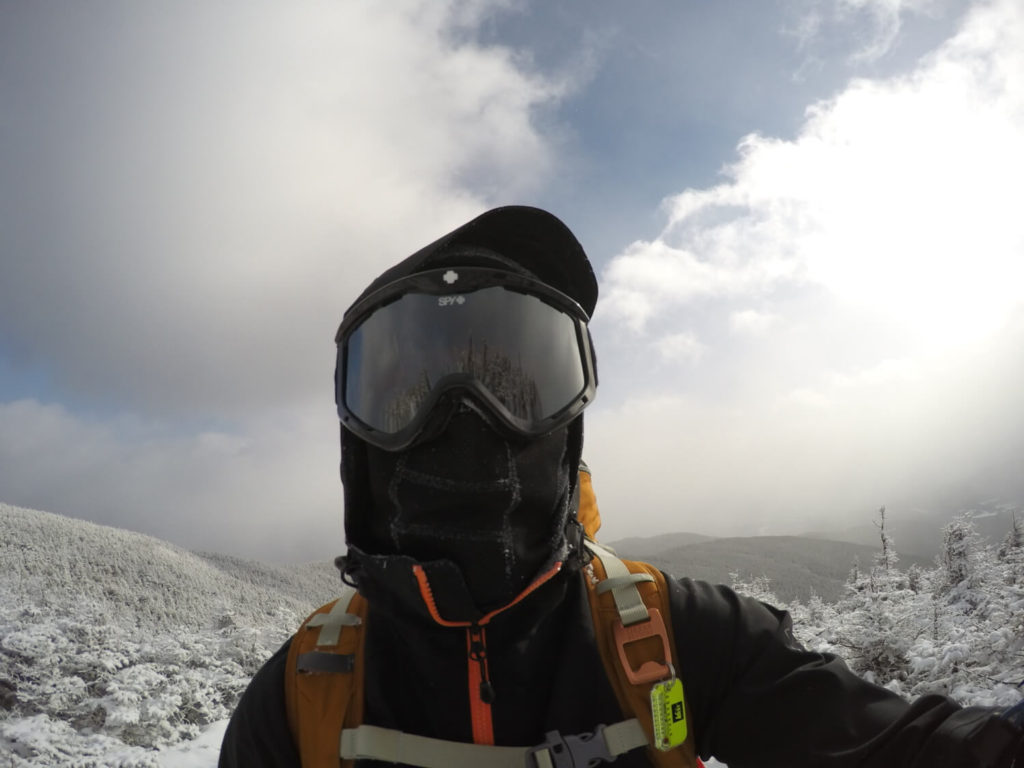
Extremely cold above treeline on Mt. Washington wearing several layers including: Base Layer, Fleece, Hard Shell and Down Parka over the top.
When things get even colder I’ll add a thin fleece jacket with a hood or I’ll throw on my hard shell to retain heat and block wind. If a hard shell is too heavy there’s an in between layer called a “wind shirt” which may work for you. This type of additional layer will keep me comfortable while moving down to the 0F point.
If I stop moving for any extended amount of time I’ll throw on my 700 fill down parka. This layer is only worn when I’m standing still, moving slowly above treeline, or just feeling cold. This layer will help me retain heat. This down parka is also part of my emergency kit paired with other items, its a great “insurance policy”.
Legs
My legs are less complicated than my torso, they tend to stay comfortable even in the coldest situations. I typically start every hike wearing thin synthetic tights as a base layer.
On top of the base layer I add soft shell pants. Soft shell pants are great for winter hiking. They resist water, are nearly wind proof, and supply just enough insulation to be comfortable. They’re also stretchy and very durable. I wear my soft shell pants for 99% of winter hiking, in a rare instance I’ll wear waterproof/windproof hard shell pants in very windy or wet conditions.
Hands
Keeping your hands warm and safe means carrying a whole bunch of gloves! Your fingers are small and easily chilled. By the time your hands start to feel painfully cold it will be incredibly hard to warm them back up. This is one of the first places frostbite will form so it’s important to keep them warm from the start.
Liner Gloves
Liner gloves are thin synthetic or wool base layers for your hands. Liners wick moisture away from your skin, and add some insulation to your gloves. I often find myself hiking in only liners until things get really cold. I carry 3-4 sets of liners that I continually rotate and swap out to keep dry. I like to choose liners with an “E-Tip” that allow me to use my cell phone without removal.
Insulated Gloves
On top of the liners comes your heavy insulation. A pair of waterproof insulated gloves with cuff that seals the seam between your jacket (referred to as a gauntlet glove) will fit the bill. This heavier glove will still have some dexterity but not as nimble as a liner.
Mittens and Shells
In the COLDEST of conditions you’ll want heavily insulated waterproof mittens. Mittens typically come in 2 peices, the internal liner (usually wool or fleece) and an external waterproof shell. Mittens allow your fingers to bundle up next to each other to provide more warmth. The downside to mittens is you essentially can’t do anything while wearing them. Simple chores like getting a drink of water becomes more difficult so it’s important to use long zipper pulls and big clips to make things easier to access.
Don’t lose them!
When wearing mittens or gloves its smart to use a wrist tether to prevent them from blowing away. Imagine taking off your glove to take a picture on the summit and it’s swept off by the wind? Now you’re in for a long cold handed hike down! Most gloves and mittens come with this leash.
Generate Your Own Heat
I like to “shake out” my hands when they start to become chilled. By swinging your arms in a circular motion you force blood into the extremities of your hands and fingers. This sounds crazy i know! but it really works! Swing your hands around for a few minutes and you’ll start to feel notably warmer.
Footwear

Socks
You’d never think the choice of socks would be so important… but it sure is! Socks can add a lot of insulation value to your feet. I ALWAYS start with a thin liner sock made from silk or polyester. This is my feet base layer and helps keep moisture away from my skin (it also reduces blisters from stiff boots). On top of the liner sock is my heavy expedition weight wool sock.
Vapor Barrier Socks
Some hikers add a vapor barrier layer to their footwear system. A vapor barrier is a waterproof membrane that will retain any heat your foot pumps out. It will also prevent any outside water from getting in. Personally… I forego the vapor barrier as I find it uncomfortable. A “vapor barrier” is just a fancy word for using a plastic bag around your foot tied at the ankle. The thin plastic bags newspapers come in, or grocery store produce bags tend to work best.
Boots
Forget about using your 3 season boots in the winter, it’s just too damn cold! You’ll want to invest in insulated winter hiking boots. I found this to be the hardest piece of gear to buy. I had tried several brands, returned several pairs. Try to purchase your boots from a store with a lenient return policy (but don’t abuse it!). You’ll want your boots to be waterproof, insulated, and comfortable. For general winter hiking a flexible sole may be preferred. For above treeline hikes, or steep routes a full mountaineering boot may be a better option.
Mountaineering boots provide a stiff rigid sole made for kicking steps and climbing steep walls. Mountaineering boots aren’t always practical for hiking but they do have a place. Mountaineering boots are used by ice climbers to ascend vertical ice. Most guide services will require you to rent double plastic mountaineering boots. These are incredibly warm but very awkward and heavy to walk in similar to a ski boot.
Gaiters
Gaiters are an accessory that wraps around your lower leg and snugs up against your boot. This device creates a tighter seal to your boot and prevents snow from getting in. Most mountaineering gaiters are waterproof, calf height, and made of a durable material called Cordura. Gaiters can also provide a surprising amount of additional warmth to your feet. I tend to leave my gaiters in the car unless there’s lots of fresh snow or it’s abnormally cold.
Pack
Pack selection will depend on what you need to carry, for me a 40L pack works perfectly. But I have seen people carrying 60L packs. I opted for a “mountaineering” style pack which has mitten friendly clips, gear loops, ski hauling loops, and a crampon pocket. Just about any 3 season pack will work, just needs to be durable and large enough to hold everything. Your pack’s suspension will need to be comfortable with the added weight of snowshoes, ice tools, etc… I like to line my pack with a trash compactor bag to keep any snow, sweat, or water from entering. “Ultra Light” style packs will work… but you must be careful with them. Snowshoes and crampons can easily tear the thin and light weight materials. Make sure all of your zipper pulls are large enough to operate while wearing large gloves or mittens. Adding a loop of paracord or twine can make your zippers much easier to open.
Food and Water
Here’s the thing about being in the cold… EVERYTHING FREEZES. This includes your food and drinking water. To avoid your water freezing you’ll want to leave the camelbak bladder at home. The small diameter tubes of these systems almost always freeze up when the temperatures drop. “Bottle Parkas” are handy insulated zippered tubes that allow you to hang bottles of water from your pack in an accessible location while insulating the water to keep it from freezing. Bottle Parkas are nice but cost money… a spare thick wool sock can also do the trick. Fill your bottles with BOILING HOT water, trust me it will cool down before you start hiking. It’s also nice to have a warm drink while you’re on the trail, adding tea or honey is a nice bonus. I always start my hikes with two 1 liter nalgene bottles in parkas. I keep one in my pack wrapped in my down jacket for extra insulation. When your bottles are running low or it is extremely cold it’s smart to store your bottles upside down. By doing this it prevents the cap and opening from freezing shut.
For food, try to avoid high moisture types like fresh fruit and large solid bars (like cliff bars) this stuff turns into icy rocks when they freeze. I like to bring some gummy candies, pepperoni, wraps, trail mix, nuts, or a peanut butter and fluff sandwich. Small pieces thaw quicker. Cutting large items into smaller chunks will make them easier to thaw. I always end up thawing the food in my mouth before I can chew it. I like to store my food in zip lock bags in a chest pocket near my body. Keeping the food close to your core will prevent it from freezing solid.
Traction Devices
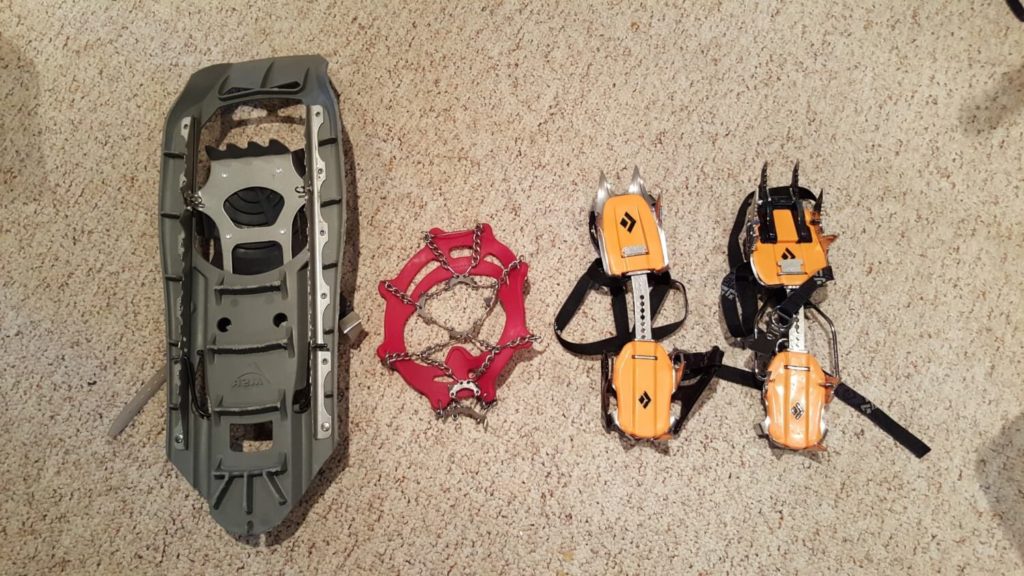
Comparing traction devices: Left to right… MSR Evo Snowshoes, Microspikes, BD Contact Walking crampons, BD Cyborg Mountaineering crampons
With winter comes snow and ice, both are difficult to walk on… particularly on steep inclines. Your boots will only get you so far, commonly referred to as “Bare Booting” before they’ll need help. Traction devices are important for your safety and enjoyment. There’s nothing more frustrating than feeling like you’re spinning your wheels and not progressing forward!
Snowshoes
These help keep you floating on top of the snow instead of falling waist deep. This reduces how hard you have to work to move forward. Snowshoes should be part of every winter hikers arsenal. Keep in mind if you bare boot up a nicely packed trail you’re ruining it for others by creating large pits. Always use snowshoes if you’re sinking! Make sure you purchase “mountaineering” type snow shoes as they’re designed for steep climbs and feature built in crampons. An additional feature called a “televator” is handy device that raises your heel from the snowshoe platform when on a steep incline. Your calves will thank you.
Snowshoes also come in a variety of sizes. The idea is generally heavier people would need more floatation to stay on top of the snow. However, I would recommend most people buy smaller 22″-25″ snowshoes since most hiking trails are already packed down. In the rare event that you’re traveling on fresh powder (also known as “Breaking Trail” ) these will still work. Some MSR models even have the ability to add length with add-on tails (sold separately).
Micro Spikes
A relatively new invention made by several companies (Kahtoola, Hillsound, and more). These are typically made up of a rubber harness that wraps around your boot with chains and pointy spikes that penetrate into ice and snow. Again.. every winter hiker needs these! They add an incredible amount of traction to your boot for a low weight. Avoid wearing them on dry surfaces as hard rock will wear the spikes dull.
Walking Crampons
Larger more aggressive spikes come in the form of crampons. Walking crampons typically strap to your boot using webbing. They offer much more aggressive teeth and traction on steep terrain. It’s important to practice walking in crampons as they are sharp and dangerous. A missed step, slip, or side step can cut right through your clothing, skin or boots. Walking crampons get put on when MicroSpikes aren’t cutting it anymore. Walking crampons feature a “spring steel” linkage that allows it to flex with your boot. This means that these types of crampons work on almost any kind of footwear!
Mountaineering Crampons
When ice or snow climbing in vertical or steep situations you need the most aggressive form of traction. Mountaineering Crampons typically have 12 to 14 teeth and are designed to lock onto your mountaineering boots using rigid clips (known as step-in crampons). This type of crampon does not flex so your boot has to be stiff and made for it. These crampons can bite into vertical walls of ice and provide a platform to stand on. Again, they’re sharp, pointy and dangerous. Caution should be taken when wearing any form of crampon. Mountaineering crampons should be used in near vertical situations where falling would result in injury.
Trekking Poles
Some live by them, some don’t use them at all. I find myself using them about %10 of the time. By adding “snow baskets” to them they float on the snow better instead of plunging into the snow. Trekking poles can come in handy on steep climbs while snowshoeing to provide balance. They can also be helpful in the absence of an ice ax. They also make a great “Selfie Stick” for gopro’s… I know, I’m vain!
Ice Ax
For above treeline travel it’s nice to have an Ice ax. Using the ax as a cane and plunging it into the snow helps greatly with steep climbs, this is known as self belay. This tool can also be used to prevent falling and sliding down a mountain in a maneuver known as self arrest. The pick on the tool can be used to stab into ice and assist in climbing over steep areas. It’s important to learn how to use an ice ax before venturing out with one. Once again… this tool is pointy and dangerous. If you fall the wrong way while leashed to an ice ax bad things can happen!
Emergency and First Aid
I try to pack light and smart. I want to be prepared to handle a bad situation but I also don’t want to carry too much added weight. My typical emergency kit consists of the following:
- SOL Bivvy bag – Mylar Emergency Shelter
- 5×8′ silnylon tarp – Emergency Shelter or Wind Break
- Thermarest foam sleeping pad – For sitting or laying on, Insulation from cold ground
- 10-20 foot section of 550 para cord – For shelter building or first aid
- waterproof matches – Fire Building
- Lighter – Fire Building
- Esbit folding stove and solid fuel tabs – Heat, Or Snow Melting
- Esbit aluminum mug – Snow Melting
- Lip Balm
- Small roll of Leukotape – First Aid
- Small roll of Duct tape – First Aid or Gear Repair
- band aides and gauze – First Aid
- Advil – First Aid
- Chemical hand and toe warmers – Heat
- Short Ace bandage – First Aid
- Tiny Multi-Tool – Misc Repairs, shelter building, etc.
- Map of the area and Compass – Navigation
Electronics
Electronics can be unreliable in the cold. Batteries die, LCD’s freeze, etc… It’s good to get into the situation knowing fully that you won’t need to rely on your electronics. I like to pack my electronics near my hot water bottle in an attempt to keep them warm and extend battery life. I typically pack the following:
- SPOT Satellite Messenger – for SOS use and “I’m OK” communications
- Black Diamond Revolt Headlamp
- Spare AAA Batteries
- USB Power bank for phone
- Samsung Galaxy S6 Phone – For topo maps, camera, and SOS
- Garmin Fenix Watch – for GPS tracking, Altitude, Compass, Temperature
- GoPro – Sometimes I bring my gopro along for pictures and video.
- PLB’s, Satellite Communicator’s or Avalanche Beacon’s
My SPOT Gen 3
In the winter injuries that would otherwise make for a bad day in the summer, can be deadly. It’s important to be able to signal for help when you’re in the backcountry and you’re in trouble. This is where PLB’s, Satellite Communicator’s and Avalanche Beacon’s come in. These devices could be considered “optional equipment”. There’s plenty of winter hikers out there without them. Personally, I tend to hike alone often so I like having a little peace of mind.
Keep Your Electronics Warm
I started to bring along a spare Bottle Parka for my electronics. I can throw a chemical warmer at the bottom and my gopro, SPOT Gen 3, and cell phone on top. It substantially improves the battery life in the cold! Alternatively you can just try to keep these devices close to your body in a chest pocket.
Misc/Tools
Things break… imagine how you’d feel if your snowshoe binding snapped 10 miles into a hike? Being able to repair something like this might save you several miserable hours. I try to carry spare parts, Allen wrenches, zip ties, duct tape, etc… for all of my traction devices. Try to identify which part may fail and what you’d need to fix it temporarily.
When to start?
Winter like conditions can start as early as November in the White Mountains of NH. It’s smart to get comfortable in the fall leading up to your winter endeavors. Challenge yourself on some 4000 footers in October and November before the season starts!
Tips And Tricks
Watch the weather! – Keep an eye on websites like mountain-forecast.com, weatherunderground.com , and the Mt. Washington higher summits forecast. If the weather isn’t cooperating and the forecast is downright dangerous, try a sheltered hike below treeline or go another day.
Tell someone – Before you hit the trail, tell a spouse, friend, relative where you’re going and what you intend to do. This will insure search and rescue will have a chance to find you if things go south.
Start Early – Everything takes longer in the winter. Don’t expect to set a new fastest known time on any trail. Start early and leave plenty of time before the sun goes down to finish.
Everyone handles cold differently – Carry a small analog thermometer (mines attached to my pack) and keep a mental log of what you’re experiencing and what clothing adjustments you need to make to be comfortable. This will help you plan more efficiently for your next hike. It’s all about learning what your body individually needs. Everyone is different!
Be Proactive – Add or Remove layers before it’s too late. Once you’re cold and wet it’s a battle to get yourself warm and dry again. When you stop moving it’s time to layer up. When you feel warm it’s time to layer down. Anticipate when you might need your goggles and heavy gloves. It’s not easy to fish them out of your pack in 50MPH sustained winds while you can’t feel your face or fingers… put them on BEFORE you break treeline.
Keep a “Grab Bag” in your car – I like to keep all of my traction devices and layers in a bin in my car. This way I can switch up my gear on the fly at the trail head. For example, if I wasn’t intending on bringing snowshoes but there was an unpredicted storm the night before. It’s better to have the options available.
Hydrate and Eat – food and water play a big role in your body’s ability to stay warm. By drinking and eating you’re supplying fuel to your personal furnace. Keep your food and water accessible while wearing mittens. If you’re water is easy to get to you’ll drink more!
Take Breaks – Often times you don’t want to stop since it results in getting cold. But by taking frequent short breaks you’ll reduce the amount of sweat you produce, this will keep you warmer in the long run.
Bailing is always an option – The mountains will be there tomorrow, you on the other hand might not be. If the weather goes south or you’re feeling weak and cold it’s time to head back to your car. Try again another day.
Know your abilities – Don’t hike Mt. Washington as your first winter ascent. Try some smaller peaks first and work up to your comfort level.
It’s not for everyone – You might like the IDEA of winter hiking but actually hate it when you experience it. It’s not everyone’s cup of tea. Don’t invest in all the gear until you know you like it.
Buddy up! – try to find a friend to hike with… solo hiking in the winter presents much greater risks than in the summer. If you’re with a group you have someone watching your back. Groups can also divide up emergency items to reduce pack weight.
Have Fun!
Some Beginner Winter Peaks in the Whites
Here’s a few great hikes to start your winter season with.
- Mt. Willard – Very easy 2800 foot peak, 3.2 miles round trip. Great place to start and test your gear.
- Mt. Tecumseh – A good first 4000 footer for your winter season.
- Mt. Waumbek – Gradual trail to a 4000 foot summit. Very protected.
- Mt. Pierce – Via Crawford Path, your first winter presidential range peak! Moderate hike with fantastic views to the north.
- Mt. Moosilauke – By George Brook Trail. Your first “above treeline” experience…360 views. A great place to test your winter gear with a safe retreat not far from the summit.
 We are proud to work with the Department of Agriculture, the White Mountain National Forest and the Androscoggin Ranger District where we are authorized outfitter guides.
